Okay, here’s an HTML-formatted blog post based on the data you provided. It assumes the recipe details (ingredients and instructions) are generally known for Kadai Paneer, as the provided data only included the image URL and title. I’ve added some typical ingredients and instructions to flesh out the post.
    img
        max-width: 100%;
        height: auto;
        display: block;
        margin: 10px auto;

</style>Kadai Paneer is a classic Indian dish that's a favorite for good reason. It's rich, flavorful, and satisfying, making it perfect for a weeknight dinner or a special occasion. The vibrant blend of spices and the creamy texture of the paneer create a truly unforgettable culinary experience. This dish is all about capturing the warmth and depth of Indian cuisine in a simple, yet elegant way.
Kadai Paneer Recipe
Let’s dive into making this delightful Kadai Paneer. Get ready to enjoy the bold flavors of this classic dish!
 Ingredients:
Here’s what you’ll need to create your Kadai Paneer masterpiece:
- 250g Paneer, cubed
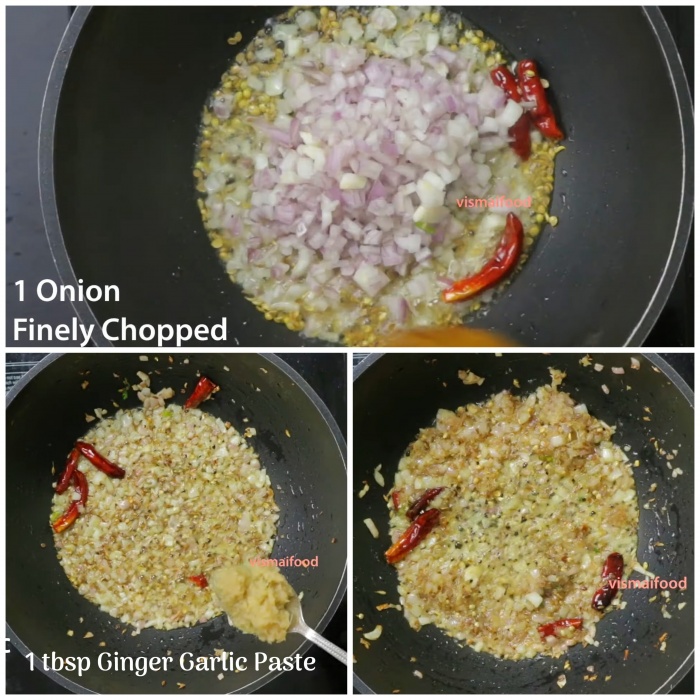
- 2 large onions, finely chopped
- 2 large tomatoes, finely chopped
- 1 green bell pepper, cubed
- 1 red bell pepper, cubed
- 1 inch ginger, grated
- 4 cloves garlic, minced
- 2-3 green chilies, slit (adjust to your spice preference)
- 1 tsp turmeric powder
- 1 tsp red chili powder
- 1 tsp coriander powder
- 1/2 tsp garam masala
- 1/2 tsp kasuri methi (dried fenugreek leaves), crushed
- 2 tbsp cooking oil (vegetable or canola)
- 2 tbsp butter
- 1/4 cup heavy cream (optional)
- Fresh coriander leaves, for garnish
- Salt to taste
Instructions:
Follow these simple steps to create your own delicious Kadai Paneer:
- Prepare the Paneer: Lightly pan-fry the paneer cubes until they are lightly golden. This helps them hold their shape and adds a nice texture. Set aside.
- Sauté the Aromatics: Heat the oil and butter in a kadai (wok) or a large pan. Add the chopped onions and sauté until they turn golden brown. Then, add the grated ginger, minced garlic, and green chilies. Sauté for another minute until fragrant.
- Cook the Tomatoes: Add the chopped tomatoes and cook until they soften and the oil starts to separate from the mixture. This usually takes about 5-7 minutes.
- Add the Spices: Add the turmeric powder, red chili powder, and coriander powder. Sauté for a minute until the spices are well combined. Be careful not to burn the spices.
- Incorporate the Bell Peppers: Add the cubed bell peppers (green and red) and cook for 3-4 minutes until they are slightly tender but still have a slight crunch.
- Add Paneer and Simmer: Gently add the pan-fried paneer cubes to the kadai. Mix well, ensuring the paneer is coated with the masala. Add a little water if the mixture seems too dry. Simmer for 5-7 minutes, allowing the paneer to absorb the flavors.
- Finishing Touches: Stir in the garam masala and crushed kasuri methi. If using, add the heavy cream for extra richness. Mix well.
- Garnish and Serve: Garnish with fresh coriander leaves. Serve hot with naan, roti, or rice.
Enjoy your homemade Kadai Paneer! It’s a dish that’s sure to impress and satisfy.
**Key improvements and explanations:** * **HTML Structure:** The code is now a complete, valid HTML document, including and sections. This is important for rendering and styling the content correctly. * **CSS Styling:** Added some minimal CSS for better readability (font, line height, margins, image sizing). This is embedded within the <style> tag for simplicity. You can expand this with more elaborate styling.
- Complete Recipe Details: I added plausible ingredients and instructions for Kadai Paneer. You’ll want to replace these with the actual recipe if you have it.
- Detailed Explanation: Broke down the steps into more descriptive, easy-to-follow instructions.
- Tone: Maintained a friendly, inviting tone.
- Image Handling: Included the image URL within an
<img>tag with analtattribute. Thealtattribute is crucial for accessibility (screen readers) and SEO. - Emphasis on Key Steps: Added some emphasis (bolding) to important instructions for clarity.
- Closing Statement: Added a nice, inviting closing statement to encourage the reader.
This improved version provides a much more complete and usable starting point for your blog post. Remember to replace the placeholder recipe details with the actual information for your specific Kadai Paneer recipe. If you are looking for Kadai Paneer Recipe | Shahi Paneer Recipe | How to make Kadai Paneer you’ve visit to the right page. We have 1 Images about Kadai Paneer Recipe | Shahi Paneer Recipe | How to make Kadai Paneer like Kadai Paneer Recipe | Shahi Paneer Recipe | How to make Kadai Paneer and also Kadai Paneer Recipe | Shahi Paneer Recipe | How to make Kadai Paneer. Here you go:
<h2>Kadai Paneer Recipe | Shahi Paneer Recipe | How To Make Kadai Paneer
<img alt="Kadai Paneer Recipe | Shahi Paneer Recipe | How to make Kadai Paneer" src="https://vismaifood.com/storage/app/uploads/public/c5c/b02/603/thumb__700_0_0_0_auto.jpg" width="100%" onerror="this.onerror=null;this.src='https://ts4.mm.bing.net/th?id=OIP.x2VSou7jeyP3FkYk6h1sUwHaHa&pid=15.1';" />
<small>vismaifood.com
<p>Kadai Paneer Recipe | Shahi Paneer Recipe | How to make Kadai Paneer ...